Post-purchase upsells are one of the most effective ways to increase your average order value. With Growth Suite, you can show special offers to customers right after they complete their purchase, allowing them to add more products with just one click.
Table of Contents
Setting up your first 1-click post-purchase upsell requires two main steps: configuring Shopify settings and setting up your funnel in Growth Suite.
Step 1: Configure Shopify Settings
Before you can use post-purchase upsells, you need to enable this feature in your Shopify admin panel.
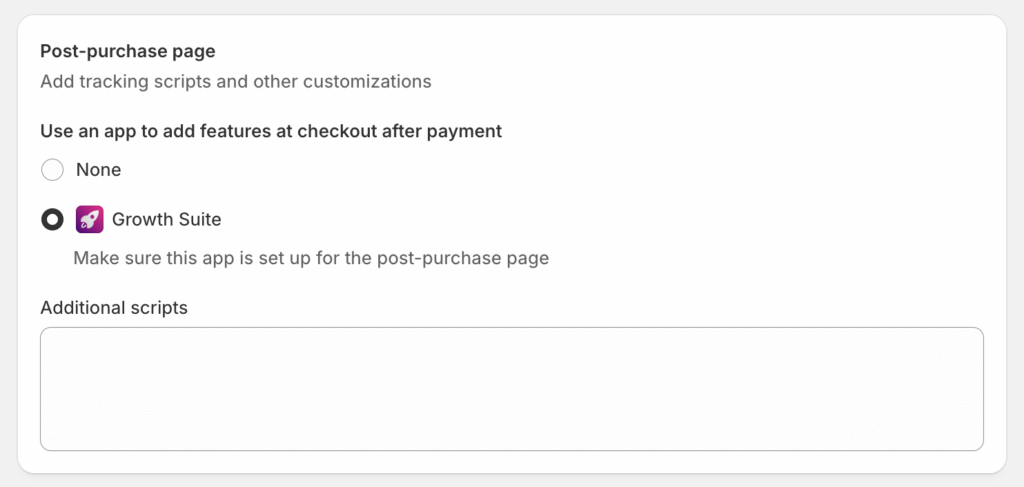
Go to Settings: In your Shopify admin panel, click on “Settings” at the bottom of the left menu.
Find Post-purchase page: In the search bar, type “Post-purchase page” and click on the page that appears.
Enable app features: Look for the option that says “Use an app to add features at checkout after payment”.
Select Growth Suite: From the list of available apps, choose “Growth Suite” and save this setting.
Step 2: Create Your Post-Purchase Funnel in Growth Suite
Once Shopify is configured, you can create your first post-purchase funnel in the Growth Suite app.
Access the feature: Open Growth Suite and click on “Post Purchase Funnels” in the left menu.
Create new funnel: Click the “New Funnel” button to start creating your first funnel.
General Settings
Start by giving your funnel a name that helps you remember its purpose. Then, check the “Active” checkbox to make your funnel live. If you leave it unchecked, the funnel will remain inactive.
Triggers & Conditions
This section determines when your post-purchase offer will appear. You can use up to 4 different filtering options:
Include Products: Choose which products customers must buy for this offer to trigger.
Exclude Products: Select products that should NOT be in the order for this offer to show.
Order Total: Set minimum or maximum order values using “greater than” or “less than” rules.
Number of Items: Control how many items must be in the order for the offer to appear.
Important: If you don’t add any rules, your offer will automatically trigger for all orders.
Offer Settings
Here you customize how your offer looks and what discount you provide:
Page Content: Write the headline and description that customers will see on the post-purchase page.
Discount Amount: Set your discount percentage. For example, if you choose 20%, a $100 product will be offered for $80.
Button Text: Customize what text appears on your action buttons.
Offer Items
Choose which products to show in your post-purchase offer. You can display up to 12 different products, but for mobile customers, 4-6 products work best.
You have two options for selecting products:
Manual Selection: Choose specific products yourself by selecting them one by one.
Smart Selection: Let Growth Suite automatically recommend your store’s best-performing products based on recent sales data.
Activate Your Funnel
After completing all settings, click the “Save” button. Your post-purchase upsell funnel is now active and will automatically show offers to qualifying customers after they complete their purchase.
How It Works for Customers
When a customer completes their purchase, they’ll see your special offer on a page that appears before the standard “Thank You” page. They can:
Accept the offer: Add the discounted product to their order with one click – no need to re-enter payment or shipping information.
Decline the offer: Skip the offer and go directly to the order confirmation page.
Best Practices
Keep it simple: Limit your offer to 4-6 products for better mobile experience.
Make it relevant: Use triggers to show offers that complement the customer’s original purchase.
Test your discounts: Start with 15-25% discounts and adjust based on performance.
Monitor performance: Check your funnel results regularly and optimize based on acceptance rates.
Post-purchase upsells are a powerful way to increase your revenue without spending more on customer acquisition. With Growth Suite’s easy setup process, you can have your first funnel running in just a few minutes.
An E-Commerce Growth expert since 2010, he is the author of "Introduction to Growth Hacking" and founder of Growth Suite. He helps Shopify merchants increase their conversion rates and grow their businesses.