Your post-purchase upsell page is where customers decide whether to add more products to their order. The way you present your offers can significantly impact your acceptance rates and revenue.
Table of Contents
While Shopify has some limitations on what can be changed on post-purchase pages, Growth Suite gives you control over the most important text elements to match your brand voice and optimize conversions.
Understanding the Page Layout
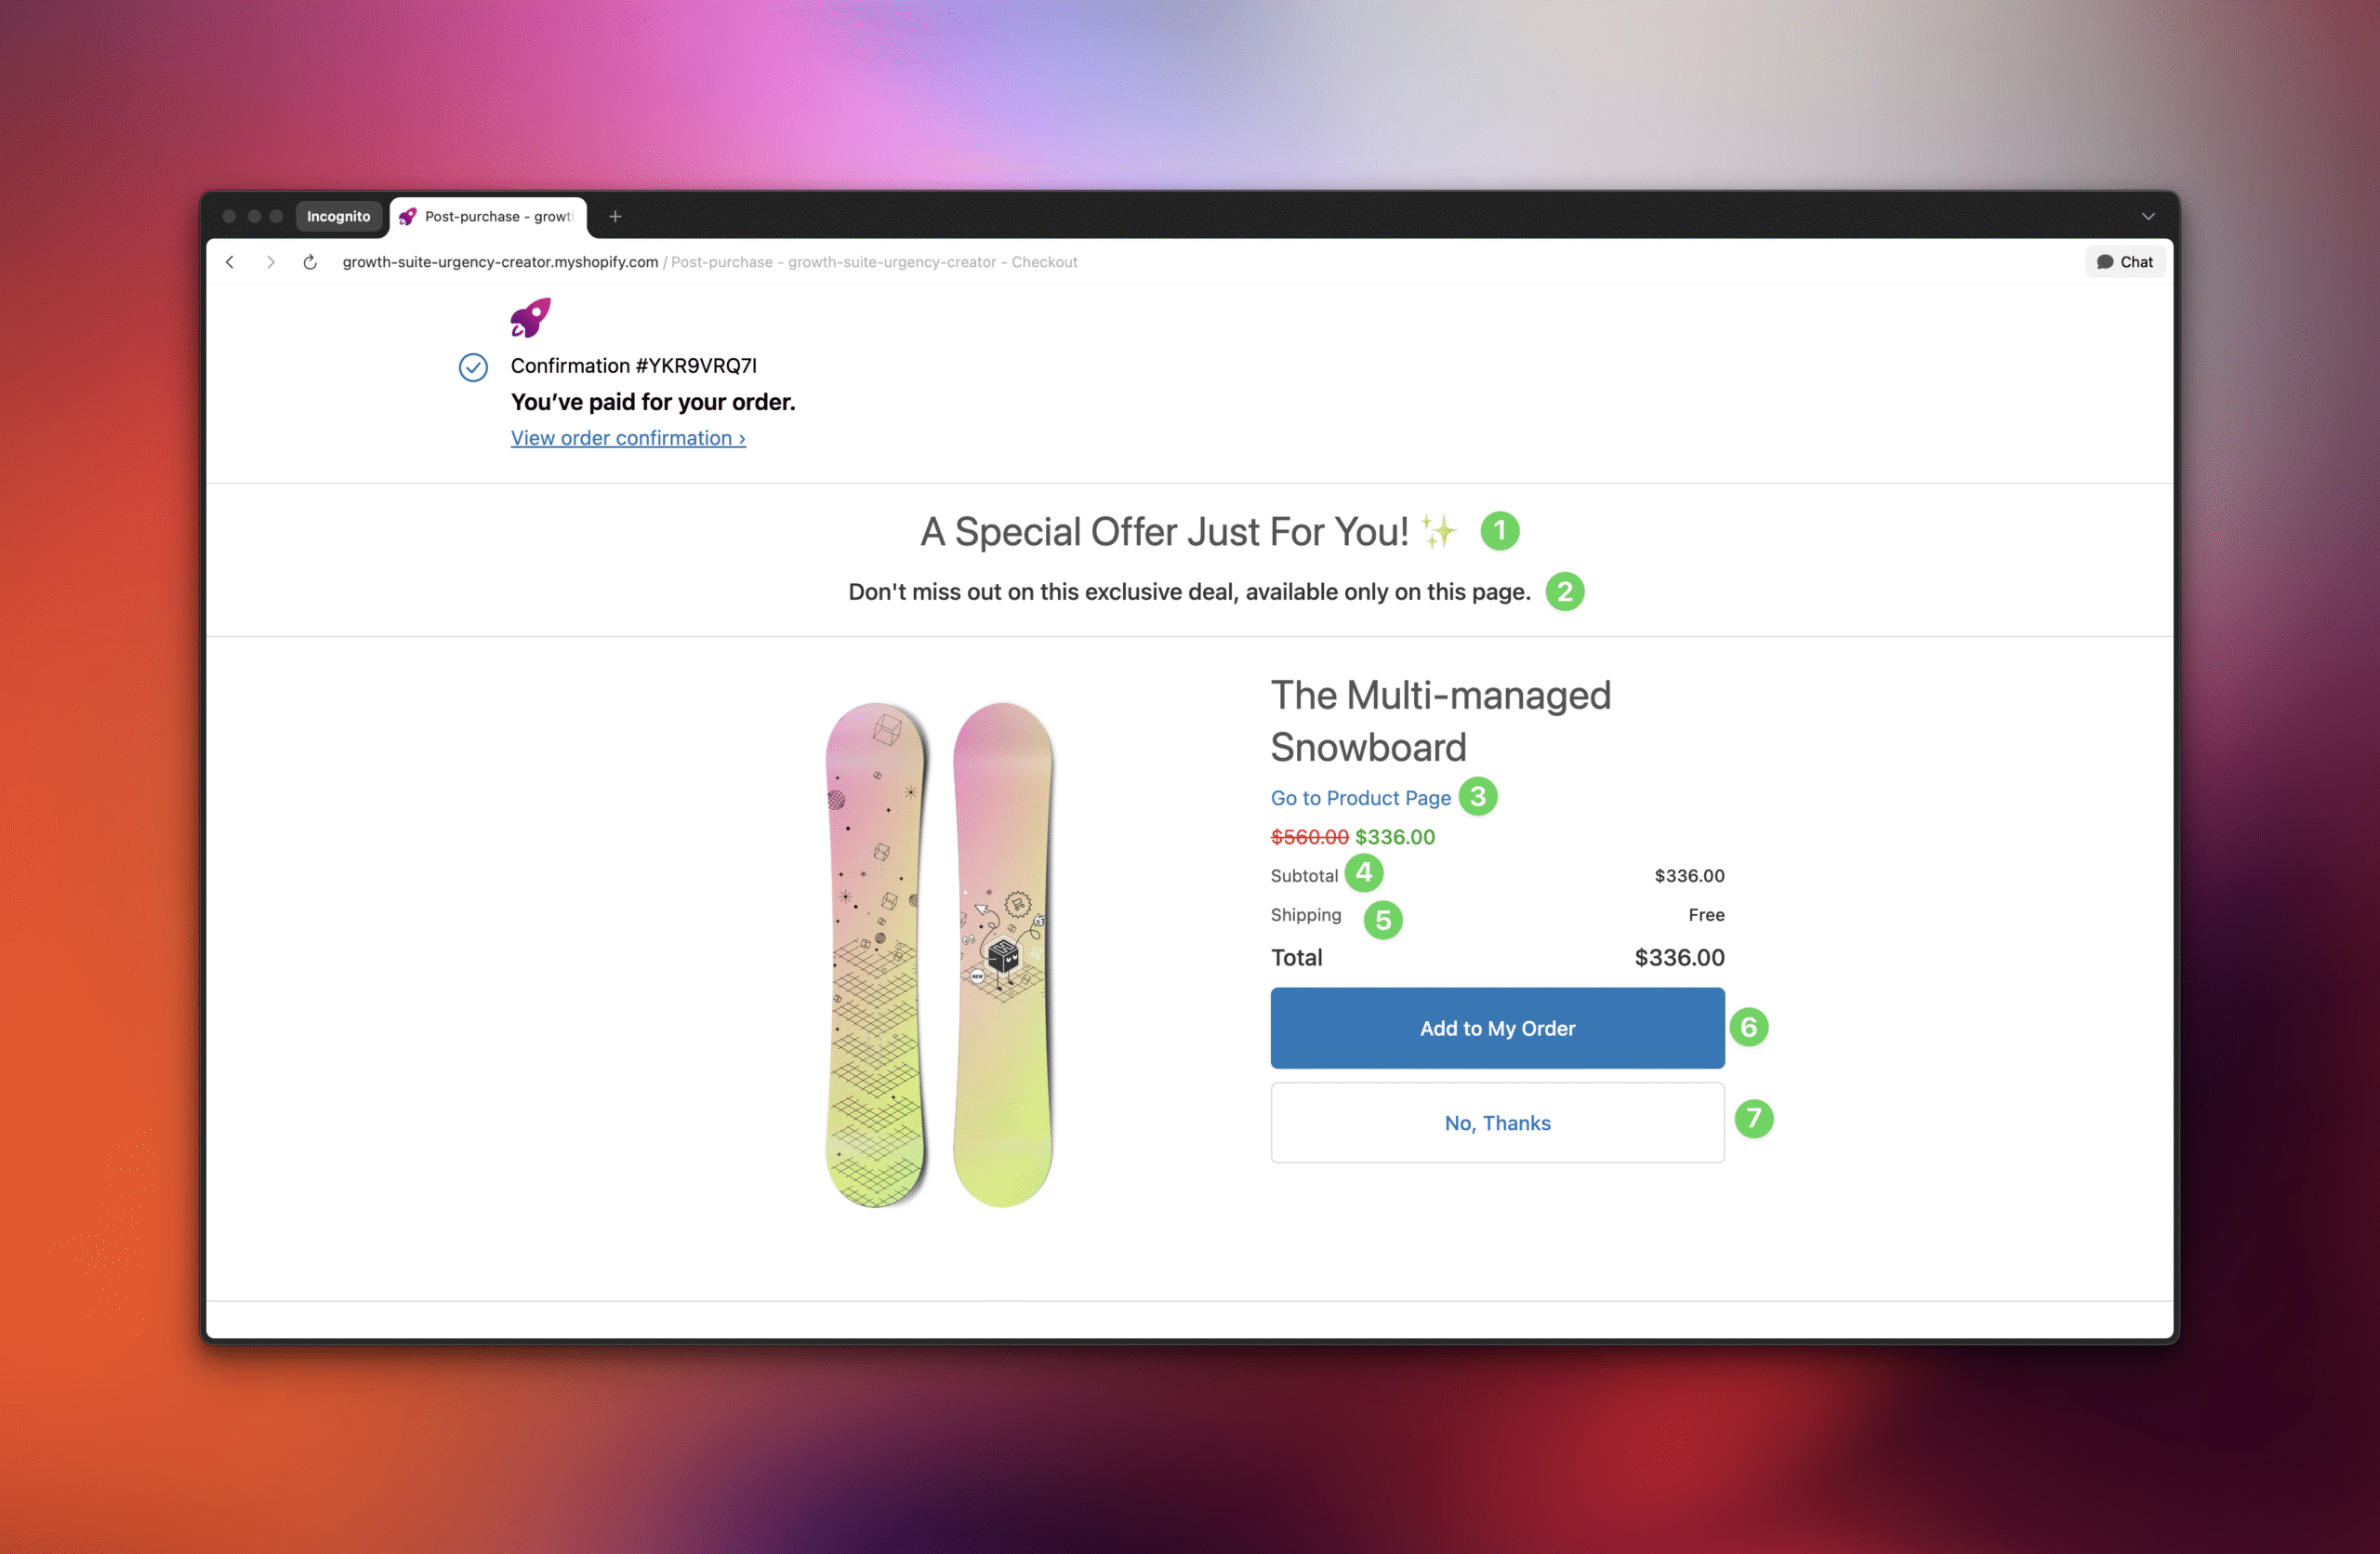
The post-purchase offer page displays between checkout completion and the “Thank You” page. It shows your selected products with special pricing and gives customers an easy way to add items to their just-completed order.
Important: Due to Shopify’s restrictions, you cannot change colors or add custom design elements. However, you can customize all the text elements to create a compelling offer that matches your brand voice.
Customizable Text Elements
Growth Suite allows you to customize 8 key text elements on your upsell page. Here’s what each element does and how to optimize it:
1. Offer Title
What it does: This is the main headline that appears at the top of your offer page.
Default text: “A Special Offer Just For You! ✨”
Best practices:
Keep it short and exciting
Use words that create urgency like “Exclusive,” “Limited,” or “Special”
Consider your brand voice – formal vs. casual
Include emojis if they match your brand style
Examples:
“Complete Your Perfect Order! 🎯”
“One More Thing Before You Go…”
“Exclusive Add-On Just for You!”
2. Offer Description
What it does: Supporting text that appears below the title to explain the offer.
Default text: “Don’t miss out on this exclusive deal, available only on this page.”
Best practices:
Keep it short and clear – one or two sentences maximum
Emphasize the exclusivity and time-sensitivity
Avoid overwhelming customers with too much text
Focus on the benefit to the customer
Examples:
“Save big on these hand-picked items that perfectly complement your order.”
“These exclusive discounts expire in minutes – grab them now!”
“Complete your collection with these specially priced essentials.”
3. Primary Button Text
What it does: The main action button that adds the product to the customer’s order.
Default text: “Add to My Order”
Best practices:
Use action-oriented language
Keep it short – 2-4 words maximum
Make it clear what happens when clicked
Consider your product type and customer language
Examples:
“Yes, Add This!”
“Grab This Deal”
“Add to Order”
“I Want This”
4. Secondary Button Text
What it does: The button that lets customers skip the offer and continue to the thank you page.
Default text: “No, Thanks”
Best practices:
Keep it polite but not too appealing
Don’t make declining the offer more attractive than accepting
Use neutral language
Keep it short
Examples:
“Skip This”
“Maybe Later”
“Continue”
“No, Thanks”
5. Learn More Button Text
What it does: A link that opens the product’s detail page in a new tab for customers who want more information.
Default text: “Go to Product Page”
Best practices:
Make it clear this provides more information
Use language that encourages exploration
Keep it descriptive but concise
Examples:
“Learn More”
“See Details”
“View Product”
“More Info”
6. Shipping Text
What it does: Label for the shipping cost line item (Shopify calculates if shipping applies).
Default text: “Shipping”
Best practices:
Keep it simple and clear
Use standard e-commerce language customers expect
Consider your shipping policy
Examples:
“Shipping”
“Delivery”
“Shipping Cost”
7. Subtotal Text
What it does: Label for the total amount line including tax and shipping.
Default text: “Subtotal”
Best practices:
Use clear, standard terminology
Match the language used elsewhere in your store
Keep it simple
Examples:
“Total”
“Subtotal”
“Order Total”
8. Discount Value
What it does: Sets the percentage or dollar amount discount applied to the offered products.
Best practices:
Test different discount levels to find your sweet spot
Consider your profit margins
Higher discounts often increase acceptance but reduce profit per sale
Start with 15-25% and adjust based on performance
How to Customize Your Text Elements
Step-by-Step Instructions
Open Growth Suite: Log into your Growth Suite app from your Shopify admin
Navigate to Funnels: Click “Post Purchase Funnels” in the left menu
Edit Your Funnel: Click on an existing funnel or create a new one
Find Offer Settings: Scroll to the “Offer Settings” section
Customize Text: Update each text field with your preferred copy
Save Changes: Click “Save” to apply your customizations
Testing and Optimization
A/B Testing Your Copy
To find the most effective text for your audience:
Test one element at a time (e.g., just the title)
Run tests for at least 100-200 offers shown per variation
Monitor acceptance rates, not just conversion rates
Consider seasonal variations in language preferences
Performance Indicators
Monitor these metrics to evaluate your copy performance:
Metric
What It Tells You
Good Performance
Acceptance Rate
How many customers accept the offer
15-30%
Learn More Clicks
How many want more product information
5-15%
Revenue Per Offer
Average additional revenue generated
Varies by product price
Common Mistakes to Avoid
Text That Hurts Conversions
Too much text: Long descriptions overwhelm customers
Weak urgency: Generic language doesn’t motivate action
Confusing buttons: Unclear what each button does
Brand mismatch: Copy that doesn’t match your store’s voice
Overselling: Trying too hard can make offers seem fake
Technical Considerations
Keep text short to avoid display issues on mobile devices
Test your copy on different screen sizes
Avoid special characters that might not display correctly
Remember that longer text may wrap to multiple lines
Industry-Specific Examples
Fashion & Accessories
Title: “Complete Your Look! 👗”
Description: “These pieces pair perfectly with your order.”
Primary Button: “Add to Outfit”
Beauty & Skincare
Title: “Your Routine Needs This! ✨”
Description: “Enhance your skincare with these exclusive add-ons.”
Primary Button: “Add to Routine”
Home & Garden
Title: “Perfect Additions for Your Space 🏡”
Description: “Complete your project with these essential items.”
Primary Button: “Add to Project”
Tech & Electronics
Title: “Essential Add-Ons Available Now ⚡”
Description: “Get the most from your purchase with these accessories.”
Primary Button: “Add Accessory”
Seasonal and Event Customization
Consider updating your copy for special events:
Holiday Seasons
Black Friday: “Exclusive Black Friday Add-Ons!”
Christmas: “Complete Your Holiday Shopping 🎄”
Valentine’s: “Show More Love with These Additions 💝”
Sales Events
Flash Sales: “Flash Sale Add-Ons – Limited Time!”
Clearance: “Final Chance for These Deals!”
New Product Launch: “Be First to Try Our Latest!”
Conclusion
Customizing your upsell offer page text is a simple but powerful way to increase acceptance rates and revenue. By using language that matches your brand voice and motivates customer action, you can significantly improve your post-purchase funnel performance.
Start with the default text and make small changes based on your brand and customer feedback. Test different variations systematically and always monitor your performance metrics to guide your optimization efforts.
Remember, the goal is to make customers feel excited about adding to their order, not pressured. Clear, benefit-focused copy that respects your customers’ intelligence will always perform better than pushy sales language.
An E-Commerce Growth expert since 2010, he is the author of "Introduction to Growth Hacking" and founder of Growth Suite. He helps Shopify merchants increase their conversion rates and grow their businesses.